Posts

Showing posts from November, 2020

Containment - Alpha

Image
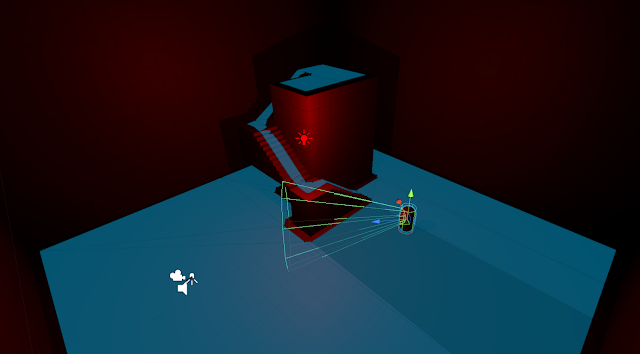
Death-Cam This week I finished off the enemy AI tracking and added in some new features to strengthen the enemy’s design and process of attacking/finding the player. I began by adding onto the base feature of patrolling for the enemy and made it so the enemy now patrols closer to the last known location of the player, this means if the player does manage outrun the enemy he will be put under a state of “high alert” which over a period of time will widen his search/patrolling distance moving him further and further away from the player, I gave the enemy some more states such as hunting, kill, and search. In the search state how it works is every time the enemy gets to his new waypoint in his patrol, he will rotate as to “look around” and search the area before waiting 5secs and moving to his next waypoint. Moving on I needed to add a feature in which if the player was caught by the enemy, they would be killed and reset, I achieved this by giving a “death-camera” to the enemy where it

Unity Tutorial 06

Image
Outnumbered and surrounded! Lesson 4.4 This lesson was a lot of fun to mess around with even though it was quick and simple to finish off. This lesson I was tasked with focusing on waves and adding a wave-like feature to the game. Basically, after the set number of enemies are killed the number of enemies spawning would increase with each round, also a new power-up would spawn each round. I think the biggest and most useful skill I learned this lesson was how to use For-loops and a new increment operator (++). I had a lot of fun testing my self and the game by seeing how many enemies I could have spawned in before I got overrun and either die or get stuck on all the enemies. Challenge 4 This challenge was a little more difficult than the last, I was more confused about what the game was trying to achieve than how to fix the game/code. I somehow magically managed to complete the bonus challenges too which I ended up bringing across over to the prototype and testing the “turbo-boos

Review Week Comments and Feedback

Image
  Since the beginning of the module I’ve loved the whole concept of leaving and receiving comments on class mates blog posts as it improves both relations within the class and helps make getting to know each other a lot easier but it also always us to experience honest criticism and help improve   each other’s work. Personally, I loved leaving comments on peoples work especially people I had never even spoken too before, I think it gave me an opportunity to open up a conversation and you have none of that awkwardness which comes with an in-person conversation so that’s a major plus. Feedback is key! I loved the comments I received on my introduction blog post and on my first game ideas blog post where people gave me feedback on which idea stood out to them the most. It's useful having a group of individuals who can quickly point out your flaws/pros within your work and give you feedback on improving or continuation of said work, kind of like having your own personal beta testers

Week 9 Reading and Writing

Image
I first struggled a lot with the reading and writing tasks due to my difficultly with dyslexia but I will say the element of blog work and controlling my own blog was and is quite enjoyable, So I think if it wasn’t for the fact that I got the chance to become and experience being a blogger I would have struggled a lot during this semester in relation to these continuous tasks every week. When I first began doing the readings solo it took me hours to read through the articles/blogs but after doing the tasks for a few weeks I slowly began to get into a routine, a way in which I could quickly pump out these tasks while still maintaining a great amount of information from articles themselves and composing an informative blog post which reflects both my understanding of my readings and the knowledge I’ve gathered from them. I still struggled with the tasks but at least now I would not fall behind on work/tasks within my module, Soon though that would all change when we decided to switch ove

First Playable - Containment

Image
  AI Navigation Pathways Now this week as I said I in my previous blog I wanted to focus on getting the enemy AI in order and have it running with its code. I started off by adding a Nav Mesh Agent which gave the enemy ai basic understanding of the map and allowed it to move around without getting stuck on objects. I soon realised that it's no good having this feature if the AI isn’t even moving around or testing its environment and so I added an “Idle” and “Walk” state to the script which would check to see if the enemy was idle if so it would change that state to “walk” and grab a random position within the nav-mesh and send the ai there, once it reaches its destination it will set the state back to “idle” and the whole sequence repeats itself again. This gave the Enemy AI a nice patrolling feature which I think I will keep in my game. After that came the hard part, adding a line of sight or a FOV like feature to the AI to allow the enemy to chase the player when it sees it. No

Unity Tutorial 07

Image
Sumo Battle Prototype! Lesson 4.1 Within lesson 4.1 I attempted to give the player a way to give horizontal input in which the camera would turn either left or right depending on the input, after that I focused on achieving a way for the player to roll for forward or backwards depending on the direction of the camera. I learnt a few new skills but nothing crazy this lesson, applying textures, getting the direction of another game object and messing around with global and local coordinates were really all I did. Lesson 4.2 Now this lesson focused on the enemy spawn system and its functionality, first I made it so the enemy spawns at a random location on the island then working on making the enemy follow the player and therefore trying to push it off the island, finally, I applied a bounce force to the spheres for when they hit each other. Physics materials were fun to mess around with I can see it being useful for having your programming recognising what surface it's on or wha

Game Fun

Image
Games can be described by the 3 components Mechanics, Dynamics, and Aesthetics (MDA) or otherwise stated as rules – system – “fun” . The three reading selections this week and the synopsis below all address the term “fun” in relation to game design. There are eight types of Fun outlined by the MDA. These eight are both a source of reference and player experience that blend together in many ways, and essentially what makes a game engaging and enjoyable. Figure 1: Eight kinds of Fun Both Oxford and Merrian dictionaries define Fun as an enjoyment, delight but within the context of a game it refers to a form of pleasurable entertainment. MDA papers define the '8 kinds of fun' sensation, fantasy, narrative, challenge, fellowship, discovery, expression, and submission, remain a source of reference and possibly the most popular list of player interactions combining in various forms to attract each player to a particular game. Nicole Lazzaro presents four types of fun that are involve

Project Prototype – Containment

Image
  flashlight/sprint feature After spending a good few hrs, I am happy with what I have achieved so far within my prototype for my game. I gave myself goals before I began working on my project so that I could not lose focus or get confused on what I was working on day by day, Today I was working on features that revolved around the player such as player movement, the flashlight system and how the player can interact with an object/an inventory system for the player. I figured getting these key features out of the way would allow me to then focus on the enemy AI in my next project build. I first began by making a simple practice map using pro builder, the reason for this was so I could practice the player's movement within the environment and see how it reacts to certain object such as stairs, angles, jumping, crouching etc. After making a nice demo room, I began making/editing the first-person feature. I found a great tutorial online for first-person which gave me an insane numbe

Unity Tutorial 06

Image
Challenge 3 Lesson 3.4 This lesson was all about finishing the game off with a nice polish here and there. I was tasked with making the game seem more lively and action-packed by adding in music and sound effects. Not only that but I also added in some nice particle effects such as when the player crashes into an obstacle. It was a lot of fun to mess around with  especially  when it came to the music and deciding which one to use. Some new skills I learnt this lesson were the audio sources component and how to interact with child objects within parents. Challenge 3 I found this challenge to be a lot more focused on the problem-solving side of things rather than it be heavy on coding which was good. Getting to use the boolean in my scripts was a lot of fun too, I used it to help keep the balloon from leaving the playable zone. Making the background-repeat itself wasn't anything crazy as we did that before and I simply fixed the spawning in of money and bombs within the script. Didn&

Games Decisions

Image
“In order for the player to be optimally engaged, challenges should be presented at a level equivalent or slightly higher than their current skill. Not too easy, not too hard”( Gigity McD ) The word 'flow state' was coined by Csikszentmihalyi (1975) also known as being “in the zone” This is when the player is fully engaged in the game experience. Csikszentmihalyi put a lot of work into observing and analysing various groups of people. This theory is focused on the idea of how people should balance their skills and the demands of particular tasks. An example of Flow would be a challenge in a game that interests the player such as a puzzle or a boss battle meant to keep the player interested and not get bored. Csikszentmihalyi also states that flow is related to an ideal psychological condition when a person engages in a challenge-skill activity, often resulting in concentration and a focused emphasis on a task. A practical technique for improving Flow is to look at what players

Game Design Document

Image
  Link to my DunDoc Project! This week we used Dundoc to help create are Games Design Document, At first, I found it a little tricky navigating around on the website but I soon got the hang of it.  I used Miro for my flowchart and looked up some articles on game elements to feature in my document. I plan on making a lot of edits to my document while I create my game.

Unity Tutorial 05

Image
Animation of Running Jump Lesson 3.1 This lesson I learned a lot more about player movement and most importantly about creating continuously generated terrain/images to mimic movement in a game. I worked on creating an empty game object which helped spawn in obstacles at certain intervals. I messed around with a lot of the physic's and gravity mechanics during this lesson too but the most notable thing I learned was most likely the use of Booleans and OnCollisionEnter() lines within the scripts, they seem really useful for coding later on in the project. Lesson 3.2 So something that was bothering myself after lesson 3.1 was that the game had no end to it, if the player did collide with an obstacle, he/she would simply continuing going forward. To stop this I coded it so that when the player collides with an obstacle the whole game stops, I made it so the background stops too, obstacles stop spawning and also now obstacles don't continue to spawn in off the screen so once they l

Games GDD

Image
What is the GDD for? A Game Design Document (GDD) is a blueprint for the design and development of a game. The GDD is a way of being creative and documenting the approach to the development of the game. Gonzale (2016) states that “ the important thing is to have something that describes your game project (or any other project for that matter) before jumping into production . ( Gamasutra ) It should help to plan out your game. Though it is recommended that the GDD should be short it needs to be detailed enough so as game developers and artists can coordinate the development of the game independently whilst still keeping to the design. The GDD is a blueprint for how the game is going to be designed and built, similar to a mind map. In conclusion, the game design document is vital to making a game and it is important to have in order to describe your game project. How do we make one? There are a variety of tools that could be used to create a GDD. These include word processing tools, vi